Showing posts with label dessert. Show all posts

Tuesday, April 30

What I ate :: Cookie Bowl & Ice Cream


Those of you who follow me on instagram may have seen a snap of my dessert last Saturday night. Jack and I had my sister over and we got a little ambitious. We started our meal off with savoury waffles topped with steak, peppers, onions mushrooms and a provolone cheese sauce - which we named... wait for it... Philly Cheesesteak Waffles! uh-yeah, we went there. After such an AMAZING meal [which will be posted next week] our dessert had to be equally amazing. Enter, pinterest.
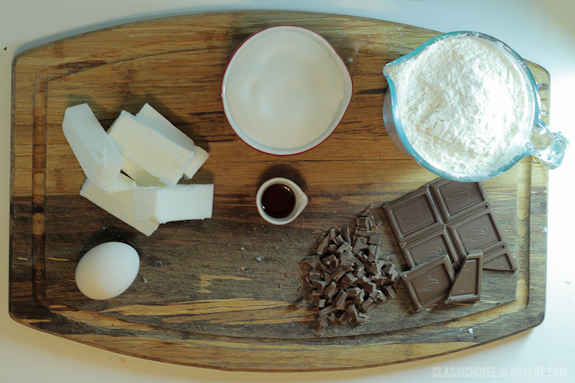


I had pinned the cookie bowl recipe a while back knowing that it was sure to come in and handy - and boy did it ever! The process is as simple as the recipe and even though we tossed in some chocolate bits - weakening the structure of the dough - they still held up beautifully. I think my favourite ingredient for this one was the touch of almond extract which adds an amazing roundness to the whole flavour.


Mixing the dough with your hands is an obvious must if you lean towards the impatient, as I do. This also allows you to feel if the dough is too dry - which mine was. If this is the case just add a tablespoon of milk and then give it another try. I think I added two all said and done.


When it came to rolling out the dough, I placed mine in between two sheets of saran wrap. I was a little nervous my dough was too sticky after the milk and didn't want to deal with the rolling-pin mishaps because of that. I rolled out the dough to approximately an 1/8" - I may suggest you go a little thinner. Although there are no added rising agents in the recipe I'm guessing my flour had some and personally, I prefer a dainty bowl to a sturdy one.


I used the cutter from my Breville Personal Pie Maker to get the 4.5" rounds I needed but I think a larger rimmed bowl would have worked just as well. As we were trying to be good - or at least not full-on gluttons [remember this was proceeded by Philly Cheesesteak Waffles] - we only cut three bowls. We then separated the remaining dough into individual portions and froze it for another time- or to be eaten frozen at midnight, tomato - tomahto.


This part was a little tricky as the chocolate would cause tears in the dough where it folded over the edge of the muffin mold. I just tried to patch it up as best as possible and gently push the edges of the dough in closer so they were resting against the mold and less likely to hang. We used coconut oil to grease the molds.


We baked at 350 for about 13 minutes and then let them cool for 10. We then gently pried them from the pan using a spatula and stuffed them full of ice cream, strawberries and chocolate. I have no regrets. 
   
ingredients below 
 

INGREDIENTS:
         2 3/4 cup flour   1 teaspoon salt
         1 cup unsalted butter 1 1/2 cups granulated sugar
         1 egg 1 1/2 teaspoon vanilla
         1/2 teaspoon almond extract                       

Monday, March 4

mmmMonday :: Peanut Butter Rice Krispies Squares


Five words, guys - Peanut. Butter. Rice. Krispies. Squares. Seriously. No lie. I've made these, eaten these, and made them again... because I wasn't supposed to just eat them - they were meant for a pot luck. 


Peanut butter has a habit of causing a meth-like dependency in me. If it's been a while since my last taste I find myself unable to concentrate, I grow cranky and I begin to do almost anything within my power to get my hands on some. Peanut butter and chocolate? WELL just go ahead and consider that my blue meth - I'm a goner.


Nothing fuels my addiction quite like pinterest and when I stumbled upon this particular photo, I was feeling quite weak. Obviously my cupboards aren't filled with hundreds of peanut butter cups on a regular basis [that is not the road to recovery] so I had to run out a buy a couple of supplies.


The process itself is really quite simple: make rice krispies, add peanut butter, add peanut butter cups. This was perfect considering that by the time I returned home, arms loaded with all the necessary bits and bobs, it was past my bed time. 

INGREDIENTS:
                        
.25 cups butter
                        
1 teaspoon vanilla
                        
8 cups rice krispies
                        
.25 cups creamy peanut butter
                        
40 large marshmallows
                        
21 peanut butter cups 
                        
1 cup peanut butter chips, melted


Start by melting your butter over medium to low heat, throw in the marshmallows and keep stirring while it melts. While this melts lay down aluminum foil in your pyrex. Lightly grease the aluminum foil with oil [I chose coconut] and then lay out the peanut butter cups. I grossly underestimated the number of peanut butter cups that were required [I think I had 12] so I got a little creative with the peanut butter chips. Funny story about those peanut butter chips.. I picked up the wrong ones - they wouldn't melt and drizzle the way they should have so at least this way they were put to use!


Once the marshmallows are mostly melted, add the vanilla and the peanut butter and stir. Take off heat and add the rice krispies. Stir it all together to combine. Once the cereal is coated, add the mixture to the pan on top of those delicious, little cups.


Pat down the mixture into the pan lightly and let it settle, about 15 minutes. Once solid, use the edges of the aluminum foil to pull it out of the dish, flip it over and then put it back in and peel back the foil. It's at this stage that you would drizzle your lovely, melted peanut butter chips if you bought the right ones. 

Since I did not, it was at this point that I cut myself a square and enjoyed a treat.. a midnight treat that led to a couple more, followed by a sleepless night fuelled by a sugar-induced need to work through life's problems. Here's hoping you make these in the afternoon. 


Monday, January 7

mmmMonday: Pumpkin Cinnamon Buns


...or as I've been calling them around here, pumpy cincin bons. Don't judge, intensive baking takes a toll on my brain box. 

The holidays were made for recipes like these. My main criteria for holiday baking are: 1. Is there cinnamon? 2. If no to one, is there peppermint? Yes to either one of these meant it was baked. I found this recipe through pinterest, originally posted on one of the most delicious blogs I know, smitten kitchen. Deb had adapted this recipe from Baked Elements. I haven't tried the original but I can vouch for this one; it's scrumptious.

THE DOUGH

INGREDIENTS

6 T unsalted butter 2 1/4 t dry active yeast 1/2 cup milk, warmed
1/4 cup brown sugar 1/4 cup brown sugar 3 1/2 cups all purpose flour
1 large egg 2/3 cup pumpkin puree 1 t salt
1/2 t cinnamon 1/4 t nutmeg 1/8 t ground cardamon
1/4 t ground ginger oil to coat the rising bowl


As I am not familiar with yeast, and the unknown scares me, I dealt with it first. Combine your warm milk and yeast in a bowl and set aside. After five to seven minutes it should be a bit foamy. Mine wasn't. Mine was a horrible, taunting clump. I'm still unsure why since as I mentioned, I have no experience with yeast. In any case, I googled and then just started whisking. Whisked like it was the only thing in the world. And guess what, it got foamy. 

Now that your yeast is under control you can move on with your life. Begin by melting your butter in a saucepan. If you're feeling extra adventurous [after killing it with the yeast] try browning it. As you may remember, I did not kill it with the yeast. I skipped browning the butter so unfortunately there are no first hand details - check them here. 

Combine flour, sugars, salt and spices in the bowl of a mixer. Add two-thirds of your butter and stir to combine. Add that pesky yeast-milk mixture, pumpkin and egg, mix again. Switch to a dough hook and let it run on low for five minutes.


Collect your awkward dough ball from the mixer and place it in a large, oiled bowl and cover with plastic wrap ...or if you've neglected to replenish your plastic wrap, a clean dish cloth. Set aside for one hour; the dough should about about double.

finished product 

Dough rolled to approximately 16x11inches, waiting on the filling

THE FILLING

INGREDIENTS

3/4 cup brown sugar
1/4 cup granulated sugar
2 t ground cinnamon


The tough part's over and the fun begins! Mix the sugars and cinnamon together. I made the two teaspoons an even Tablespoon because I'm a BIG fan of cinnamon so feel free to use your discretion. 


Generously brush the remaining melted butter over your dough. Sprinkle the filling mixture evenly over the buttered dough. Taking the longer side, begin rolling the dough into a tight spiral. The first roll will be the hardest, making you wish you had six while still refusing any help offered to you. Once you get that first roll off the counter though, the rest will be cake.

Once rolled, gently saw the roll into approximately one inch pieces. I found using a bread knife very helpful. The sawing helps to ensure the dough isn't stretched and pulled every which way. You should have around 16 - 18 pieces. Next, place your rolls in a pan [two pans if you have small ones] side by side. We didn't have a lovely round dish so I used my haggard square one.


Cover the pan[s] with plastic wrap and let them rise for another 45 minutes. If you are completely exhausted by this point, and I don't blame you if you are - I was, feel free to leave them in the fridge over night. If you do this, remove them from the fridge first thing in the morning and leave them to rise for an hour.

Preheat the oven to 350, bake for 25 minutes. 

THE GLAZE

There are two ways to make the glaze. The first way: beat the cream cheese until super light and fluffy. Add icing sugar and vanilla, beating as you go along, and drizzle in milk until you reach your desired consistency. Neat, clean and no fail. 

The second way, my way - the-no-nonsense-I've-been-making-cinnamon-buns-for-four-hours-way: Add all glaze ingredients to the bowl. Mix. Pass out. Wake up when the oven timer goes off signally you can finally eat those delicious buns!

Since only two of us were eating these luscious buns, we drizzled our glaze on a bun by bun basis. If you have more friends, or like to share, go ahead and add all the glaze and dig in.


Definitely check out the original post for the full story as I may glaze over some of the details, 
forgive me, I am stuffing one of these beauties into my mouth as I type. 

Monday, November 19

mmmMonday: Pumpkin Pie!


In honour of American Thanksgiving this week's mmmMonday features my family go-to pumpkin pie recipe. I had planned on sharing this recipe back in October before Canadian Thanksgiving but you know how it goes, intentions and all. 

This pie is delicious. It's just the right amount of sweet and spicy AND, as with all great things, it gets better with time. Bake it the night before and it will be just perfect come your big dinner!


One of my favourite things about pumpkin pie is how simple it is to throw it all together. Not like some foolish apple, or berry pie. The ingredients below are for one pie, if you'd like the costco-sized recipe for 3 pies, let  me know and it's yours.

INGREDIENTS:
                        
1 1/2 cups pumpkin puree
                        
1t cinnamon
                        
1 can evaporated milk
                        
1/4t ground cloves
                        
2 beaten eggs
                        
1/4t nutmeg
                        
1/3 cup brown sugar
                        
1/4t allspice
                        
2T maple syrup


Preheat your oven to 450 degrees. Combine all your ingredients into one bowl. No need to get fancy, just throw them in and mix until you have some thing resembling the below. Once all mixed, set aside and get to work on your dough.


I used the Tenderflake Pie Dough recipe a while back and still had some lying around [it freezes well for about 3 - 4 months]. If you're using dough from scratch, sprinkle flour onto your counter and then roll it a little larger than your pie pan. 


Once large enough, drape over your pan and lightly press it down, ensuring that there are no air bubbles. Stab crust with a fork as back up ...and for fun. Don't get too over zealous though. I have and it didn't end well for the crust. Once prepared, pretty-up the edges, you know, to be extra impressive. By this point I'm usually bored so I just smush everything hanging over the edge together.


Pour in your pie mixture. Every. last. drop.


Place in the oven and bake for 15 minutes. Then reduce the temperature to 350 and continue baking for another 40 minutes, or until it seems ready. You'll know if it looks like the below. You can let it cool and have a piece right away [topped with maple whipped cream obviously] OR you can wait until tomorrow and it will seriously be 100% better. Just wait. You'll thank me.


Friday, June 22

Food Friday: vegan brownies!


Let's just say these brownies are delicious. I'm just going to put that out there right away... you need to know what you're getting into. Right now you're thinking, I'm going to give these vegan brownies a shot because they're healthy-ish and I want chocolate. But you don't know. You don't know that they are actually the best brownies you will ever have. You are unaware that this no-bake, 4-ingredient brownie batter with a 3-ingredient icing will be the death of any summer-living healthy-eating pipe dream you had. Now you've been warned, so please, enjoy.


                BROWNIE  
1/2 cup cocoa powder
2 cups hazelnuts
1 cup pitted dates
1/4 cup maple syrup
                                ICING  
1/4 cup cocoa powder
1/4 cup + 2 Tbsp maple syrup
1 medium avocado
...


This recipe is definitely much easier if you have a legitimate food processor. However, my little wannabe did me just fine. If you do have a food processor, pulse the hazelnuts until finely ground into a flour. Next, add in your dates, 1/2 cup cocoa powder and 1/4 maple syrup processing into a thick dough that sticks together.

If you don't have a nice, big food processor, do the same but in bunches that your little wannabe can handle. Slowly but surely. Don't get impatient, it's definitely worth it. I did the hazelnuts first, set them aside and then did the dates. Next I tossed the cocoa and maple syrup in with the dates and then began sprinkling in the hazelnuts. Just when I thought everything was lost, I tossed everything in a bowl and finished up with my hands. It looked perfect. 


Pack the dough into a ball and then roll it out between two sheets or parchment, shaping it to be cut into brownies. With a sharp knife cut the dough into equal sized rectangles. With the extra dough, re-form into a ball and repeat. 

I halved the recipe when I did it, so you'll likely have a lot more to roll our than what's pictured above.


Make the icing by blending the avocado, cocoa and maple syrup. Blend until velvety smooth and adjust the sweetness to your liking. Once the icing is ready, frost the brownies stacking pieces by two. Garnish with crushed hazelnuts.


Friday, February 3

Food Friday: S'mores Bars


Yes, you heard right; S'mores bars. They exist, it's not a dream. I know, I did a double take the first time I got wind of this too. In fact, I think I yelled at my screen "I've been dreaming of this day for so long, it can't be true." But they are. They are true. And they are DELICIOUS. I've been a fan of s'mores since I had my first one three years ago - yeah I know, sheltered - but I've never cared for the uneven melting a campfire offers. With s'mores bars, there is none of that NONSENSE! My thinking is, this is a little taste of what heaven would be like.

Don't actually use marshmallows. I tried it and they disintegrate. But they sure are pretty.

INGREDIENTS
1/2 cup butter, room temperature
1/4 cup brown sugar
1/2 cup sugar
1 large egg
1 tsp vanilla 
1 1/3 cups flour 
3/4 cup graham cracker crumbs (approximately 7 full graham crackers)
1 tsp baking powder
1/4 tsp salt
2 or 3 super-sized (5 oz.) chocolate bars
1 1/2 cups marshmallow creme/fluff (not melted marshmallows)

Preheat oven to 350 degrees


Cream together butter and sugar until light. Beat in egg and vanilla. In a small bowl, whisk together flour, graham cracker crumbs, baking powder and salt. Add to butter mixture and mix at a low speed until combined. 

Grab a 8 x 8, or 11 x 7 pan. Butter it. Butter it good. Divide dough in half and press half the dough into an even layer of your pan. Next lay down the full chocolate bars and then begin to scoop the fluff in a layer on top.


As tough as it's going to be, do not eat the chocolate bars before you get a chance to use them in the recipe. I started in on them, which is why you see all the chocolate evenly spaced in chunks around the dish, that and my low-level OCD of course. This is not the best way to go about it. The fluff is sticky and a life-ruiner. If I had been able to control myself and not give into that sweet, delicious, milky Cadbury the fluff debacle may never have been and I'd be a different person today.

Now I didn't take photos of the next, difficult and irritating part, but you can go here to see how it's done. I apologize for leaving it out but I was slightly cranky. It's actually not too hard to roll out but getting it from the saran wrap to the top of the fluff is super fun (italics = sarcasm).     

Bake for 30 to 35 minutes and then let cool completely.


Finally, make sure that you can bring these to your office, a party or a friends' house or else you will eat them ALL. You may enjoy it at first, but believe me, your tummy will turn on you later.

Friday, January 20

Food Friday: Carrot Cake


Carrot cake... where do I begin??
I make this cake at minimum, 2 times a year (usually it's more like 4 -5).
It all began when Jack and I first started dating and I found out that he LOVES carrot cake. If it were a human I would have some intense competition for his attention. Even as a baked good it often overshadows me... but that's an issue for another time.

So, two times a year I'm required (although I do so lovingly) to make this cake.
The first time is at Jack's birthday, the other is at Ruby's (Jack's sister)
Apparently the whole Carr family has a thing for carrot cake
and when Ruby realized Jack was getting it on an annual basis she signed up, although under the strict request that there be no nut OF ANY SORT included in the cake. She's "allergic".  


Carrot Cakes are pretty easy to make, they're just slightly time consuming. 

1 & 2 - The hardest part to get through is the beginning when grating carrots. Usually I am able to coax someone else into doing this for me, but this time I was on my own. It. took. FOREVER. I'm serious. The only reason I didn't go crazy while doing it was that I pulled up a stool and set up Gossip Girl (pre-Christmas)- I recommend it for everyone. 

3 - A key thing to remember is to shift that s*** (i.e. flour, baking powder, spices, etc.) Sifting when baking cakes, muffins and cupcakes, makes all the difference in the world. When I make a special cake, I even sift 2 - 3 times - yeah, that's right, I over do it. That's how I roll folks; all or nothing.

4, 5 & 6 - Another trick I like to use when making cake (although it is slightly less effective when carrots or other disruptive ingredients are involved), is to separate the yolk from the egg white. I mix the yolk in with the rest of the wet ingredients and then beat the whites until they form soft peaks.

Place the egg whites aside and continue the recipe as instructed. Once everything is mix in, fold in the egg whites. This should help make your cake lighter since the white add air into the mixture - it's the bees knees. 

 FULL RECIPE (It's my go-to)


The icing is fairly simple and completely delicious.

1. Make sure you have enough icing sugar. I always assume I have enough but never do. Checking first will save you a trip to the store in your sexy sweats and lounge-wear.

2. Take your room-temperature butter and cream cheese and blend them together. Take these out when you begin your cake. I never do. I only think of them as the cake goes in the oven and then I have to wait. Don't worry though... I always have tons of Gossip Girl to catch up on, and once that's done there's always Vampire Diaries (or VD, as Mary would prefer call it).

3. Blend everything with your mixer. Don't be a hero, mixing by handing does nothing for anyone. Everything includes, vanilla, icing sugar, butter, cream cheese and grated lemon and orange rind. Don't think this is enough of a recipe? Here's the full thing.

4. Oh yeah, the orange is my secret edition. So don't tell anybody... I'm looking at you, internets.


Now all you gotta do is decorate to your hearts content. Sometimes I fill the iced cake with walnut pieces, other times I use the coloured icing tubes to decorate. When I feel fancy I go all out a create tiny little marzipan carrots that I paint with orange food colouring and top with cloves.

The one note I will make is, when layering cakes it helps to shave off the top rounded part of the cake. This will help them stack better and prevent sliding.

My decorating job for Jack's birthday 2011