Showing posts with label what I ate. Show all posts

Thursday, July 3

What I ate :: FISH TACOS


My-oh-my it has been a long time since I last posted a recipe. Not to worry, both the eating and cooking have continued... but anyone who follows me on instagram already knows that. As much as I love recipe posts - and I really, really do - each time I work on one my dinner takes 2 hours longer to prepare resulting in some fairly attractive posts, and some very cold dinners. Well, if you can't beat 'em, join 'em. And with that, I present to you, one of my favourite cold dinners - fish tacos!


The first thing you need with any taco is salsa. The fresher, the better. The chunkiest, the bestest. I always like to make extra as salsa keeps well and is always high in demand. My fresh salsa varies slightly each time I make it, this time I kept it extra simple. All you need to know is ::
                      >> 1 cup chunky tomatoes
                      >> 1 tablespoon diced onions
                      >> 1/2 cup chopped cilantro
                      >> juice of 1/2 lime
                      >> 1 teaspoon chili flakes or 1/2 jalapeno


One of my favourite things about these tacos is just how beautiful each part of the fixings is. The purple cabbage is not only delicious in the mix but gorgeous in the stack. I like to pile the cabbage as close to the avocado as possible because they just look so. darn. pretty.
                      >> 1 avocado, sliced thinly
                      >> 4 thin slices of lime
                      >> 2 cups of cabbage
                      >> 1 cup Greek plain yogurt
                      >> 1 tablespoon mayonnaise
                      >> juice of 1/2 lime


Slice the cabbage into thin strips. I used a mandolin and escaped with all my finger tips intact to get the perfect cabbage you see before you. Mix together the Greek yogurt, Mayonnaise and juice of half lime. Stir in 2 Tablespoons of the mixture into the cabbage. Put aside.

Preparing the fish is very simple. Combine the below ingredients over heated olive oil on medium heat, turning once at 3 minutes per side. With so little use of the stove, this meal is perfect for those scorching, muggy nights we've been getting lately.
                      >> 1 lb thawed tilapia
                      >> 1 tablespoon of olive oil
                      >> 1/4 t. of chili powder
                      >> 11/4 t. of black pepper
                      >> 11/4 t. of sea salt.


Now you're ready to stack! Take your whole wheat tortilla, or tostado, and add the fish, cabbage, salsa, avocado and drizzle some of the remaining yogurt mixture overtop. Pour yourself a nice crisp glass of white, sit back & enjoy!


♡ ♡ ♡

Tuesday, April 30

What I ate :: Cookie Bowl & Ice Cream


Those of you who follow me on instagram may have seen a snap of my dessert last Saturday night. Jack and I had my sister over and we got a little ambitious. We started our meal off with savoury waffles topped with steak, peppers, onions mushrooms and a provolone cheese sauce - which we named... wait for it... Philly Cheesesteak Waffles! uh-yeah, we went there. After such an AMAZING meal [which will be posted next week] our dessert had to be equally amazing. Enter, pinterest.


I had pinned the cookie bowl recipe a while back knowing that it was sure to come in and handy - and boy did it ever! The process is as simple as the recipe and even though we tossed in some chocolate bits - weakening the structure of the dough - they still held up beautifully. I think my favourite ingredient for this one was the touch of almond extract which adds an amazing roundness to the whole flavour.


Mixing the dough with your hands is an obvious must if you lean towards the impatient, as I do. This also allows you to feel if the dough is too dry - which mine was. If this is the case just add a tablespoon of milk and then give it another try. I think I added two all said and done.


When it came to rolling out the dough, I placed mine in between two sheets of saran wrap. I was a little nervous my dough was too sticky after the milk and didn't want to deal with the rolling-pin mishaps because of that. I rolled out the dough to approximately an 1/8" - I may suggest you go a little thinner. Although there are no added rising agents in the recipe I'm guessing my flour had some and personally, I prefer a dainty bowl to a sturdy one.


I used the cutter from my Breville Personal Pie Maker to get the 4.5" rounds I needed but I think a larger rimmed bowl would have worked just as well. As we were trying to be good - or at least not full-on gluttons [remember this was proceeded by Philly Cheesesteak Waffles] - we only cut three bowls. We then separated the remaining dough into individual portions and froze it for another time- or to be eaten frozen at midnight, tomato - tomahto.


This part was a little tricky as the chocolate would cause tears in the dough where it folded over the edge of the muffin mold. I just tried to patch it up as best as possible and gently push the edges of the dough in closer so they were resting against the mold and less likely to hang. We used coconut oil to grease the molds.


We baked at 350 for about 13 minutes and then let them cool for 10. We then gently pried them from the pan using a spatula and stuffed them full of ice cream, strawberries and chocolate. I have no regrets. 
   
ingredients below 
 

INGREDIENTS:
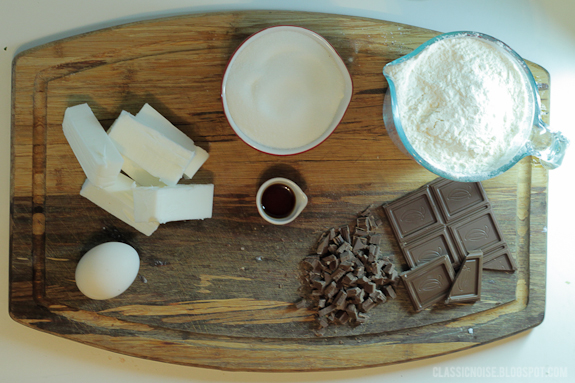
         2 3/4 cup flour   1 teaspoon salt
         1 cup unsalted butter 1 1/2 cups granulated sugar
         1 egg 1 1/2 teaspoon vanilla
         1/2 teaspoon almond extract                       

Monday, April 15

mmmMonday :: brown sugar


Did you all know how easy it is to make brown sugar!? It is crazy easy. I had no clue until last week when I was overcome with an intense need for chocolate chip cookies. Unfortunately we were out of brown sugar and this obviously hit during the pout-inducing April snow-storm and coincided with my refusal to leave my home. As baking chocolate chip cookies without brown sugar is completely out of the question I had to get creative ...or leave my house.  


INGREDIENTS:

1 cup granulated sugar
1 Tbsp molasses


Pour molasses onto white sugar. Mix with a fork or wooden spoon. Five minutes later you have the freshest, fluffiest brown sugar you will have ever seen ...and you didn't even have to venture out into that horrible snow storm.


Monday, March 25

mmmMonday :: Taco Salad


I'm all about the layered salads. There's something about hiding certain ingredients below all the fresh veggies that just makes it so much more exciting to eat. This specific salad is one I ate on repeat during the weeks leading up to our wedding last summer. It has the perfect combination of protein, legumes and fresh veg to keep you healthy, stuffed and satisfied.


MEAT


Although incredibly less photogenic than the other ingredients, the salad just isn't the same without it. We make our own taco-esq spice using powdered chilli, cumin, salt, oregano and chilli flakes. We usually we this as our base and then edit depending on which ingredients we forgot to restock.

To prepare ground beef [we usually use a 1/2 pound for 3 - 4 salads], begin by sauteing diced onions. Add ground beef, taco spice and 1/4 water. Mix together and let beef brown until cooked. Set aside. 


GUACAMOLE


I'm a sucker for a fresh guacamole, especially if I'm going to skip cheese and sour cream. All the ingredients in my guacamole are roughly the same as what I put in my fresh salsa, minus the avocado and times a bunch more tomatoes.

1 avocado 
2 Tbsp diced tomatoes
2 Tbsp diced green peppers
2 Tbsp diced onions
1 clove garlic
1/4 lime
1 Tbsp chopped cilantro
1 tsp chilli flakes
dash of salt and pepper

Mash avocado. Add the rest. Stir. All done!


Whether you're using dried or canned, black beans [or turtle beans] really round out the dish. Once ready, heat a pan with 1 tablespoon oil. Add diced onions and saute. Once softened, add black beans and cook until warm.

Now for the layering. Add black beans to the bottom, top with cooked taco meat and mounds of fresh veggies on top. Finish the dish with a spoon full of salsa and guacamole on top and enjoy! 


Monday, March 18

mmmMonday :: easy peasy Energy Bars

Recently, Jack and I have been trying to eat healthier. Since moderation is not really in either of our vocabularies, we attempt to avoid starch, dairy and sugar Monday through Friday, noon. Once the weekend hits, all bets are off and we gorge ourselves stupid ...well, not really [okay sometimes].

This tends to work fairly well. Come 3pm however, things can get a little dicey. My heart beats a little faster, my eyes get dart-y and I can't concentrate. All my thoughts are stolen by daydreams of macaroons, lemon tarts, cookies, gummy bears and milkshakes - basically, anything and everything I'm trying to avoid. 


These bars are perfect for when you're jonesing for sugar but you're trying to layoff the cookies. I mean, what's more healthy than getting your sugar fix from dates. I don't know if you know this, they're fruit!! 

The original recipe only had three ingredients but since I'm full-time fancy, I threw in some coconut. If you add coconut you'll have to offset it with a few more dates. I added 1/2 cup coconut and then an additional 1/4 dates... so three, because they're massive.

INGREDIENTS
 

1 cup pitted dates
1 cup craisins [or raisins]
1 cup almonds


If you have a good food processor, go ahead and throw all the ingredients in and set to chop. I forgot about my beautiful KitchenAid blender and used my chop-o-matic. It did nothing. Actually no, scratch that. It did the almonds and then broke. Just gave up. Enter KitchenAid blender.


I then added the almonds and coconut to the fruit and let it combine for another 2 minutes. It should be fairly sticky at this point. If it's not, blend a little longer. If it still isn't, add more dates or craisins - it should help. If there's still no luck, you probably weren't meant to eat these.


Once the texture is sticky enough to not crumble, roll into a ball and place between two sheets of saran wrap. Roll out to your desired thickness and then slice into bars. These guys may not look like much but they pack a punch so don't make them too big.


Since having these my 3pm sugar rage has subsided and my coworkers no longer avoid my meeting requests.


Monday, March 4

mmmMonday :: Peanut Butter Rice Krispies Squares


Five words, guys - Peanut. Butter. Rice. Krispies. Squares. Seriously. No lie. I've made these, eaten these, and made them again... because I wasn't supposed to just eat them - they were meant for a pot luck. 


Peanut butter has a habit of causing a meth-like dependency in me. If it's been a while since my last taste I find myself unable to concentrate, I grow cranky and I begin to do almost anything within my power to get my hands on some. Peanut butter and chocolate? WELL just go ahead and consider that my blue meth - I'm a goner.


Nothing fuels my addiction quite like pinterest and when I stumbled upon this particular photo, I was feeling quite weak. Obviously my cupboards aren't filled with hundreds of peanut butter cups on a regular basis [that is not the road to recovery] so I had to run out a buy a couple of supplies.


The process itself is really quite simple: make rice krispies, add peanut butter, add peanut butter cups. This was perfect considering that by the time I returned home, arms loaded with all the necessary bits and bobs, it was past my bed time. 

INGREDIENTS:
                        
.25 cups butter
                        
1 teaspoon vanilla
                        
8 cups rice krispies
                        
.25 cups creamy peanut butter
                        
40 large marshmallows
                        
21 peanut butter cups 
                        
1 cup peanut butter chips, melted


Start by melting your butter over medium to low heat, throw in the marshmallows and keep stirring while it melts. While this melts lay down aluminum foil in your pyrex. Lightly grease the aluminum foil with oil [I chose coconut] and then lay out the peanut butter cups. I grossly underestimated the number of peanut butter cups that were required [I think I had 12] so I got a little creative with the peanut butter chips. Funny story about those peanut butter chips.. I picked up the wrong ones - they wouldn't melt and drizzle the way they should have so at least this way they were put to use!


Once the marshmallows are mostly melted, add the vanilla and the peanut butter and stir. Take off heat and add the rice krispies. Stir it all together to combine. Once the cereal is coated, add the mixture to the pan on top of those delicious, little cups.


Pat down the mixture into the pan lightly and let it settle, about 15 minutes. Once solid, use the edges of the aluminum foil to pull it out of the dish, flip it over and then put it back in and peel back the foil. It's at this stage that you would drizzle your lovely, melted peanut butter chips if you bought the right ones. 

Since I did not, it was at this point that I cut myself a square and enjoyed a treat.. a midnight treat that led to a couple more, followed by a sleepless night fuelled by a sugar-induced need to work through life's problems. Here's hoping you make these in the afternoon. 


Monday, February 18

mmmMonday: Mushroom soup


I must admit that this was the first mushroom soup I've ever made and therefore do not have much to compare it to. Even still, I have a feeling this one's a keeper. The ingredients remind of a symphony; a perfect medley, each part in its rightful place adding to the overall experience. Didn't you know? I take soup seriously.


INGREDIENTS:
                        
1 pound mixed mushrooms
                        
.25 cups cognac
                        
1 pound cremini mushrooms
                        
3 tablespoons olive oil
                        
.5 cups minced shallots
                        
4 cups chicken [or veg] stock
                        
6 sprigs thyme
                        
.25 cups whipping cream
                        
1 sprig rosemary
                        
.25 cups chopped chives

Begin by de-stemming the mushrooms, setting the caps to the side. Roughly chop the stems and put them to simmer in the chicken broth for about an hour.


While your broth simmers, chop the mushroom caps into about 1/2" slices. Honestly, I found this to be a little thick which added to the cook time, so I may chop them smaller next time.


Heat the oil in a large skillet and saute the shallots until they're transparent. Add the herbs and some salt and pepper.


Add the mushrooms to the shallots and herbs. Turn the heat down to low allowing the mushrooms to gently cook until the liquid is released and then reabsorbed. About 15 minutes.


Turn the heat up once the mushrooms have softened and add the cognac. I didn't flame it because I'm a klutz and cannot be trusted near an open flame, however feel free to give it a try if you're more trustworthy.


Lower the heat slightly and allow the mushroom mixture to cook until the liquid has reduced further and the mushrooms are golden around the edges. 


Strain the mushroom stems from the broth and add the mushroom cap mixture heating gently. Add cream and chives to the soup and stir. Serve right away, or save for lunch the next day.